
|
First, a big thank you to those who commented and emailed ideas and topics that contributed to the latest tool for this site - the Trapeze Calculator.
Quick Calc With only a few "knowns" (pipe diameter and schedule, and distances to nearest structure), you can now quickly calculate the section modulus that's required, visit options for the trapeze bar, and see these options schematically in a to-scale detail. Multiple Pipes Have multiple pipes on a trapeze? Calculate the section modulus required for each, add the two moduli together, and simply override the Section Modulus Required value below to see your options. Get CAD Details Want a CAD version of the detail? Sure thing - the downloadable All-Access Toolkit allows you to save and print these calculations as PDFs, which can then be imported directly into AutoCAD and use the ALIGN function to scale it to your drawing. Toolkit Users Already a Toolkit user? Install the latest version from your dashboard to get the updates to this tool. No new activation code is necessary. Don't see the tool below? Try it out here - This site is all about finding ways to help you be the office hero with quick and helpful fire protection tools. Get these weekly articles straight to your inbox by subscribing here.
Thanks for those who have provided feedback thus far - here's the progress on the Trapeze Sizing Tool.
----- Also, quick note: today is the last day to get the custom mousepad with the Toolkit. If you're an all-access subscriber of the Toolkit (new today or prior), be sure to fill out your information to get a free one on the dashboard. Those will be sent out starting next week. ----- The tool was not allowing any entry when it initially posted but that's cleaned up now. I've updated some hanger detailing, labels, and Unistrut sizing. What else would be helpful to incorporate here? I plan to add some flexibility on structure types, include a graphic scale, and offer options for which trapeze to show (the default is Schedule 10 pipe). Also, for contractors - what is your preferred method of attachment and hanging for the trapeze? A washer and nut would typically be used for Unistrut and angle iron, but what about pipe as a trapeze? I'd like to detail what is realistic and preferred in the field. As always, feel free topost comments here or shoot me an email with ideas. Thanks in advance! Know others who might be interested? Send them a link. If you're not already subscribed to these weekly resources & articles, subscribe here.
First, a huge thank you to everyone who's expressed interest and purchased the Toolkit - I very much appreciate the fantastic response to the launch over the last three weeks!
It's a short post this week - I've been developing a Trapeze Hanger tool that sizes and schematically details trapeze hangers. This will likely be the first of three posts while developing this tool. Questions for you at this point in time: (1) What other possible standard trapeze materials do you use that could be helpful as part of this tool? (2) What would you like to see shown in the detail? (3) If the detail could be easily translated to AutoCAD from this calculator, could it be something helpful for your projects? If so, what would you want shown and identified? Click here to test and comment on the Trapeze Hanger tool, thanks in advance! Know someone who might be interested in resources or articles like this? Forward to a friend. Don't get these articles sent weekly to your inbox? Subscribe here. I've occasionally run into predicaments on projects that put me in a tough position. A couple weeks ago as part of a rural project in a small town outside of Memphis I was helping coordinate a flow test between a hired sprinkler contractor and the water utility. I had initially asked both the fire and water department if they conducted tests or had interest in witnessing, asked for sprinkler contractor recommendations, and then called the nearest sprinkler outfit I could find (which happened to be an hour and a half drive away). They agreed to run a flow test for $500. I gave parameters on which hydrants I felt we needed tested and gave the go-ahead. Results from the test were very poor. A static of 65 psi dropped to 40 at only 580 gpm, with the extrapolated curve showing a maximum capacity of around 800 gpm at 20 psi.  Flow test results are dependent upon quality visual readings and calibrated equipment. Based on the intent of the project with significant storage capacity (think ESFR), we were looking at both a pump and a tank to supplement both pressure and flow. The hiccup came when I caught word from the water department who told the general contractor (our client) that the sprinkler company used a gauge that didn't zero out and the water department suspected was not calibrated. Based on past history the water department expected better flow in the area (at least), and were surprised that the flow had been so low. Now to the minor dilemma - we need the test re-run (especially if there's water storage tank implications) - so does that mean having the same sprinkler contractor run the test again? The water department, after talking the situation with them, wasn't a big fan. Do I find another sprinkler contractor, and have to eat the original $500? Do I play the game that many general contractors would run, and not pay the $500? 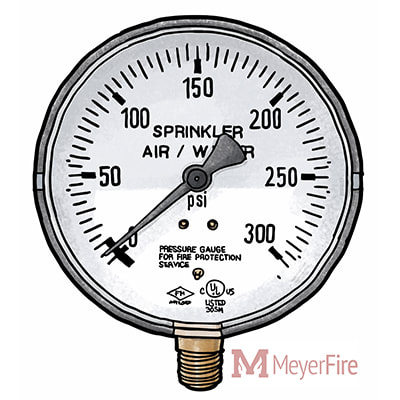 Pressure gauges can become less calibrated over time - and the further they get from true readings the less reliable the resulting data becomes. I'm not the kind of person that generally makes a phone call without some kind of directive or question in mind, but I called the contractor and just laid out what I had heard and asked how they wanted to handle it. Fortunately, the sales manager was extremely helpful and offered to re-run the test at no additional charge (despite the one-way 1.5 hour drive to the site) with a new set of gauges.
I'll get the results this week or next, and I suspect that with even slightly better flow information there could be big impacts on the sizing of water storage. I was on the receiving end of generosity and being well-served in this case, and I am very thankful for it. Being in business affords us the opportunity to make many decisions and serve other people. One of my favorite aspects of running a small team is having the opportunity to serve people very well and own our mistakes. Clients don't always expect perfection, but a full-fledged genuine effort to serve in a client's best interest usually results in successful projects and happy clients. I don't expect every flow test, every installation, or every encounter to be perfect - but having people who are willing to own a mistake and take steps to correct it are the type of people I enjoy working with. This blog began as a way to share weekly takeaways in my role as a fire protection engineer. If you know someone who might be interested in the resources and articles, send them a link or subscribe yourself here. It's that time of year to find someone who is taking the PE Exam and give them a hug. Or don't, because that's kind of unprofessional, but do be very empathetic. It's always clear from my end that there are so many people who are spending lots of time preparing for the big day on October 26th. Interest Way Up Thanks in large part to word of mouth from those who had purchased the PE Prep Guide and Weekly Exam series in past years and the use of the guide in the 2018 SFPE Online Course, I've seen a major uptick in interest this year. As an estimate from the overall participation in last year's exam, roughly 2/3rds of all examinees this year will walk into the exam room with the 2018 Edition of the Prep Guide. That's very encouraging and I thank you all who have promoted the book and continue to give feedback to help make it better for others. I'm shipping copies daily with even more in inventory, so if you're looking to get a copy you can still get one today.  Big Impact with Weekly Exam This year was the first summer I've been able to use data from last year's users to refine and improve the questions. It's been a major improvement over last year and I am glad to continue to get positive feedback and interest. The Leaderboard posted weekly on the Daily page shows these all-stars at work. I think each year the folks studying seem to get better and better in their preparation and this year is no exception. We've had some requests for even more problems (above the 300 in the weekly exams and the on-demand series), so I've just opened 4-hour and 8-hour exams that mixes old problems from weeks 1-18 to test yourself again. If you're a Weekly Exam user you can see those here. Checklist of Resources Occasionally around this time of year I hear from a few people that don't know about some of the available prep materials. Here's a short list to make sure you're taking advantage of everything available. 1. A list of all Fire Protection PE Exam materials I know 2. Join the free private Facebook group with many great discussions and questions about the exam 3. Daily PE Exam Problems (over 90 to date) 4. PE Prep Guide and Weekly Exam Series, with Errata 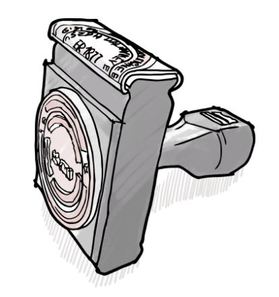 Last Exam Tips If you have a copy of the Prep Guide you already know there's quite a bit of detail on exam advice passed down through the years included in the book. For this summer I'd just like to say to remember that no matter how hard you've prepped, there will be questions that seem to come completely out of left field, are over-emphasized in the exam, or are worded poorly. Not only do some of these questions not even end up graded, but remember that everyone else taking the exam will have a similar experiences. All you can do is your best and forget the rest! The Toolkit package is here! This week, as part of the big launch, you can get every tool we have available: Get access to the Sprinkler Database, downloaded tools, post-a-question and more today. The Toolkit is a downloadable package that allows you to PDF, print and save your calculations as well as get access to the Sprinkler Database and a host of other benefits. 
A couple of weeks ago I debuted a concept I've been working on which analyses fire pump curves and their combination with city pressure. With a handful of helpful suggestions, here's the latest iteration.
The big news this week is that this tool, alongside everything else I've created to date, is now available as the MeyerFire Toolkit - it's downloadable, printable, PDF-able version of each of these tools as well as a way to access the Sprinkler Database and all of our flowcharts and tables as PDFs.
What updates can I incorporate from here? Comment below for advice & feedback on how you'd like to see it completed.
If you're new to the blog, be sure to subscribe here for free weekly articles & tools. Things are busy and trending up around here - On Monday of next week the Toolkit officially launches. As a subscriber you'll now be able to use the Toolkit alongside the Sprinkler Database, get all flowcharts as PDFs, and be up to date on the latest tools we're creating and testing around here. Stay tuned for emails next week with the big launch and special offer details.  I started working with fire suppression systems as a bid/spec designer who did both upfront "full-design" as well as "performance-spec" or "design/build" criteria. I'll save frustrations and pet-peeves with this approach for a later time. While I still help architects put those packages together, several years ago I also began helping contractors with permit design, hydraulic calculations, installation detailing, and stocklisting. To say that this foray into seeing the other side of the industry is eye-opening would be an understatement. I've learned so much and perhaps only now realize how much I still have to learn. Here's my top takeaways from pulling back the curtain and working with Oz: 1. Details Are Critical Probably the biggest adjustment when working on installation drawings as opposed to an upfront 'full-design' is that each and every detail is critical. The goal becomes less of "is this a code-compliant, efficient design?" and rather becomes "is this a code-compliant, most efficient design?" What happens when a pipe is fabricated to exact lengths and ends up overlapping with a steel beam by 1/2-inch? Steel beam wins. My buddy in the field now has add a spool piece or re-cut pipe. What happens when you accidentally order unions instead of couplings? You get a phone call. 2. It's Just Theory Until Someone Has to Do It In some ways, living on the 'engineering' side of a project and not the contracting end is dabbling in theory. Even if pipe, fittings and equipment are all shown on bid documents, there's still someone on the back-end putting together installation drawings and a contractor that's looking at it before it gets installed. When you're the guy on the back-end, it's no longer theory. A dimension from a pipe to structure is where it's supposed to go in the field. My point is, my fantasy-world of someone else correcting my schematic layout before it gets installed is no longer there. 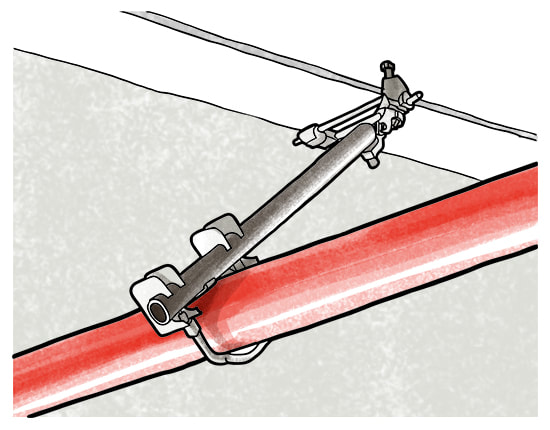 How many components are shown here? I used to see this as a pipe with a lateral seismic brace. After designing installation drawings and stocklisting, I see at least four assemblies with a wide range of options, listings, and details. 3. Preferences Vary Widely Prefer flex drops to hard pipe? What about grooved & welded branchlines over threaded? Want Viking, Vic, Tyco, Reliable, or Globe sprinklers? What about hanger attachments? Preferences vary widely, and while all of the above are code compliant, there is a ton of variation in how different people prefer to purchase and install a system. 4. Ain't Nobody Got Time for This Think architects have tight deadlines? When a subcontractor has a contract held out for long periods of time, only to finally be released for work and in the next breadth asked when submittals will be complete - there's a time crunch. Not all projects designs are under tight timelines and if contracts are released in good time sometimes there's a decent amount of breathing room. But in many cases, my clients need turnarounds as soon as possible. 5. Think Differently Once our drawings were unstrapped from the titleblock and drawing convention (scale, fonts, numbering) typically dictated by the architect - a world of possibility has opened up with flexibility on the documents. Want to know why many shop drawings have details thrown on the same sheet as the plan? It's because the installer may only be carrying that sheet when he or she installs that area. We made the leap a couple years ago to do 100% BIM, whether the job required it or not. In doing so, there's been many opportunities to approach how we construct our drawings differently. When everything is modeled, section cuts become very easy. Want isometrics for risers and complex areas? Done. Why is 1/8-inch scale so prevalent in the shop drawing world? It's about the smallest scale we can do to see everything on a sheet. Traditionally, drafting was labor intensive and each sheet represented a real cost incurred to the designer and thereby the building owner. This resulted in reducing the number of sheets whenever possible. Now, with computer drafting and even more-so in the 3-D world of BIM, scale is almost irrelevant. I find the notion of charging clients by the sheet almost funny now. My life becomes so much easier using 1/4-inch scale - drawings are cleaner, I can show two-line pipe and fittings, annotations take far less time to clean up, and I've yet to have a complaint from an installer concerning the larger scale. In talking to software developers at HydraTEC there's a real sense that BIM will change how we construct drawings. When there's little to zero extra effort to show sections, isometrics, or renderings, then the question becomes less about how much time it takes to show extra detail and instead what presentation offers the best explanation of what we're trying to indicate. It's a really exciting place to be when you're at that point.  Taking the leap into 100% BIM (building information modeling) on every job has been a challenge, yet now pays off in ways I would have never anticipated with better-orchestrated drawings and flexibility in overall presentation 6. Lack of Information & Consideration Probably my most frustrating lesson is that with many 'design-build' jobs that don't incorporate an engineer tasked with fire protection, there is zero consideration to where fire sprinkler systems and components are going to be installed. I've had many projects put out to bid that don't even state whether a building is going to have an NFPA 13 system, much less space allocated for the sprinkler riser on an exterior wall. For a functional bid, there's a few important details I think would help contractors compare apples-to-apples, and that's for another time but at a minimum should include (1) applicable code, (2) coordinated service entry, (3) flow test information where calculations are needed, (4) pipe specification, and perhaps (5) hazard criteria. 7. Boy There's A Lot to Learn Years ago I was told it takes a solid 6-8 years or so of work in this industry before you gain a foothold in understanding the breadth of the work involved. Malcolm Gladwell, author of the Best-Seller "Outliers", discusses the now famous 10,000-hour rule whereby in order to truly be an expert in a topic, one must amass 10,000 hours of quality experience in that arena. While I hold both of those considerations to be somewhat valid, I also realize after amassing those totals that I still have so, so much to learn in this industry. Please don't think that just because I record and share my thoughts here that I'm in any way more capable or more of an expert in this space than you are or can be. I was on a jobsite yesterday getting installer feedback on one of my latest projects. While walking the job, we discussed at least a dozen different areas that the design could be improved to benefit the installer, allow for flexibility in field adjustments, and ways to route pipe that doesn't upset the other trades. The entire discussion didn't even touch code - there were no code issues - rather it was all about improving design technique for future projects. My joy in sharing this material as someone who is not a refined expert, a Fellow SFPE, or the committee chairman of a major standard is that I can cover the small tips and nuances that we naturally gather and learn along the way. There's so much in the day-to-day where just starting the discussion has value. Know someone who might appreciate this article? Forward to a friend.
Get these weekly articles, for free, by subscribing here. Based on some feedback and good ideas I've been experimenting with graphing fire pump & flow test curves with usable data outputs. Below is the first iteration for drawing a fire pump curve alongside a water supply curve.  Determining ideal fire pump configurations for sprinkler and standpipe systems can be an important part of optimizing fire suppression design Here's the help I could really use from you - what else would be included in your ideal pump curve?
Would you prefer this be on a logarithmic x-axis? Want 175 & 300 psi limit lines shown? Would you want to see at what height in a building the 175 psi threshold would occur - on this graph? System demand and hose? I'm open to any and all ideas - in the end I think it'd be great if this tool was the quickest & best method for summarizing and analyzing fire pump output. Share your ideas in the comments here, thanks in advance! |

ALL-ACCESS
SUBSCRIBEGet Free Articles via Email:
+ Get calculators, tools, resources and articles
+ Get our PDF Flowchart for Canopy & Overhang Requirements instantly 
+ No spam
+ Unsubscribe anytime AUTHORJoe Meyer, PE, is a Fire Protection Engineer out of St. Louis, Missouri who writes & develops resources for Fire Protection Professionals. See bio here: About FILTERS
All
ARCHIVES
May 2024
|
 RSS Feed