
|
This week we have progress and are continuing the effort to create an open, easy-to-edit and easy-to-digest basic sprinkler specification. The first week we touched on the need and developed the general criteria. Last week we expanded on the feedback and introduced equipment to the spec. This week we’ve adapted the specification based on feedback from you (thank you!) and are adding in the ‘means’ portion of the specification. THE GOAL OF A SPEC Our goal here is to have a simple baseline specification that answers the most critical questions which a specification should resolve, and otherwise stay out of the way. A great specification should:
OUR INTENT This specification is not intended to replace consultant’s own customized specifications that are well thought out, intentional, relevant, and updated. They are intended to be a free, easy-access alternative to stand in for specifications that are boilerplate, don’t answer critical questions, or haven’t been updated in twenty years. Based on your feedback, this week’s updates include references to water storage tank, using an imperative tone, cleaning up portions of the system, adding standpipe and dry system references, and incorporating your comments.  YOUR INPUT NEEDED Here are the key areas I'd love to hear from you about as we take the next step in building the specification:
THE 'SPEC GENERATOR' IDEA One of the ideas we threw out initially along with an open-specification was a new specification generator. The basic concept is that you'd play a game of "20 Questions" and in less than a minute you'd have a fully-edited specification. Most contractors I speak don't believe that specification editing actually takes any time at all - mostly because they're used to reading copy/paste boilerplate specification. But consultants know that a well-edited, accurate specification can take hours on each project between selection, making the edits, QC, formatting, and updates. Depending on how many people are involved in the process and how complex the job is, this sometimes takes 2-4 hours just in specification editing. The concept we're working on in parallel with this is a basic specification generator that does the editing for you, and provides meaningful tips on editing along the way. My intent is to pop this right into MeyerFire University with the other tools there about as soon as we're done with the open-spec. Here's a short video on the concept: Don't forget to comment below on the questions we posed. I am very grateful for your input and willingness to push the industry ahead, as always! - Joe
3 Comments
We've had some breakthroughs with our interactive learning over at MeyerFire University that I wanted to share. If your team could stand to improve their skillset and resources, or you simply haven't looked at our MeyerFire University in awhile, I'd very much encourage you to do so. We are working hard to tangibly shake up the way our industry learns, all for the better. Click the image below to see a sneak preview of what's going live on the University in two weeks (April 29). Thanks for being part of our journey, and I hope you have a great rest of your week! USE GOOGLE FOR FLOW TESTS & SITE PLANS I sometimes (maybe often) have to learn things the hard way. This tip today comes from the “Lessons Learned” file, where it took me two bashings over the head before I had my ‘aha’ moment. Forgive me if this is obvious and you've been doing this for years. Again, I have to learn things the hard way sometimes. So what is it? What are we talking about? Clearly identifying the location of the water supply. And the ‘aha’ answer – well it’s really simple and can be really helpful. On many projects we use a flow test to get an idea of the available water supply. We use the available water supply curve to calculate how much pressure and how much flow we have available that can serve our suppression system (sprinkler, standpipe, etc). Flow tests carry a whole lot of engineering nuance. A flow test is simply an instantaneous “point in time”. It doesn’t account for demand variations like the time of day, day of the week, or seasonal demand like the lawn irrigation system next door. We’ll save that conversation for another day. One other key factor that a flow test carries is that it is highly dependent on the location from where the test was run. DOES THE LOCATION OF A FLOW TEST MATTER? If we have a large, looped supply, then the location horizontally may not play much of a difference. Say we have an Ordinary Hazard Group 2 sprinkler system and our main outside is a 12-inch looped main. The exact point which we tested isn’t going to affect our system all that much, because we wouldn’t get a lot of pressure loss in a 12-inch looped main when we’re only flowing 550 – 750 gpm. What if we’re not looped? What if it’s a dead-end 6-inch main instead of a looped 12-inch? Well, now our horizontal location could be critical. If our flow test is taken immediately adjacent to our building, then we have a high degree of confidence of what the water supply is doing right where we’re going to tap it. But, if our flow test was actually taken 1,500 ft upstream and we have a dead-end 6-inch supply, then we need to calculate the loss through that entire dead-end supply. That could be a lot of pressure loss! For example, for a 750 gpm sprinkler system, running friction loss for 1,500 ft of 6-inch pipe would lose 16.3 psi. That would have a major impact on most system designs. So, suffice to say, it can be important to document exactly where a flow test was taken horizontally. It also matters, however, in the other plane. DOES THE ELEVATION OF A FLOW TEST MATTER? There’s a chance, depending upon the project, that the horizontal location of a flow test may not play much of a factor in the system design. But the elevation of a flow test? That will always play a factor. If our static/residual hydrant (gauge hydrant in the diagram) is actually 30-ft lower in elevation than our project site, that has major implications. Let’s take a quick example. We look at results from a flow test showing a static pressure of 60 psi with a residual pressure of 50 psi at 1,200 gpm. If that test was taken at the same elevation as our project (a big large flat open field, for example), then we would expect a pressure gauge at the riser to be somewhere around 58-60 psi when nothing is flowing. The pressure gauge and the original gauge hydrant are very close in elevation. However, what if that test (those readings) was actually taken down the hill, at an elevation that was actually 30-ft lower than our project site? We would have a lot less available pressure. As we go deeper in a system, pressure increases. As we rise up within a system, pressure decreases. So a riser that is approximately 30-ft above the gauge hydrant would have an expected pressure of around 47 psi (60 psi – 30-ft x 0.433 psi/ft). That might not sound like much, but in some projects without a fire pump where we are already tight on the hydraulic calculations, this can be a major issue. AN EASY SOLUTION FOR THIS I’ve had two major project issues related to bad documentation of exactly where the flow test was taken. Most projects I see have a simple description for where a test was taken. It’s something like “at the corner of McKinley & Brower Streets” or “1000-ft east on Highway D from the flow hydrant”. Sometimes it’s a description like “on Highway T”. Having an intersection will generally help us narrow down which hydrant was actually used in the test. Usually. Having a description on the road doesn’t help us narrow down much, unless there’s only one hydrant within a half mile radius. What is very, very helpful for narrowing down which hydrant was used? GPS coordinates. USING GOOGLE MAPS Within google maps, it’s extremely easy to precisely locate any point on earth. You don’t even have to go into Google Earth, like we did in an article to grab elevation here. To grab any GPS coordinate on Google Maps, just right click and you’re presented at the top with the coordinates. Click on those coordinates to “copy” the coordinates where you can then paste them, as text, anywhere else. 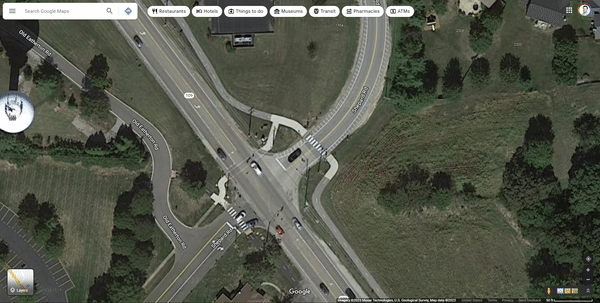 Grabbing coordinates off Google Maps is as easy as right-clicking, then selecting the coordinates. Now, you can paste them into your flow test report, paste them onto your site plan, your hydraulic calculation report, or anywhere else. You only really need to go four decimal places for the coordinates – anything more and you’re talking about less than an inch – which of course is far too precise for what we need here.  Coordinates can then be pasted into anywhere - flow test reports, plans, hydraulic calculations. Anywhere you need. If later on, someone needs to verify a hydrant elevation, they can just copy and paste these same coordinates back into Google Earth (to get an elevation), or paste these right back into Google to get the location in Google Maps.  Later, anyone with those coordinates can paste them into Google or Google Earth (here), and find the location and the elevation at which those coordinates were taken. In Google Earth, the bottom-right corner shows the elevation. Using GPS coordinates for flow tests is extremely easy to do. What’s most important, though, is that by providing the coordinates for where the test was taken, you’re taking out so much ambiguity. Construction documents are only created for communication. If they don’t clearly communicate, then they’re not serving their purpose. I’ve only recently reached this ‘aha’ moment, but using the coordinates has already helped on recent projects. What about those two major project issues? What was up with those? One was related to a very poor description for where a flow test was taken (a flow test that I received from the city and failed to document well). The other was a flow test that had been taken a good 1,000 ft upstream on a 6-inch dead-end main. In either of these cases, had I correctly documented the exact location of the test, or had I received the exact location of the second test – we would have had no issues at all, because we could have accounted for these differences during the design of the project. Hope this tip helps you avoid some headaches in the future, and that you have a great rest of your week! - Joe
This week we're featuring a free preview of one of our instructor-led videos on the MeyerFire University platform. Chris Campbell, a Fire Protection Engineer & Writer at the BuildingCode.Blog joins us to discuss what is a "Mixed-Use", or more appropriately, a "Mixed-Occupancy" building under the International Building Code.
Click here, or the video above, to check out what exactly is a Mixed-Use Building. Hope you have a great week! |

ALL-ACCESS
SUBSCRIBEGet Free Articles via Email:
+ Get calculators, tools, resources and articles
+ Get our PDF Flowchart for Canopy & Overhang Requirements instantly 
+ No spam
+ Unsubscribe anytime AUTHORJoe Meyer, PE, is a Fire Protection Engineer out of St. Louis, Missouri who writes & develops resources for Fire Protection Professionals. See bio here: About FILTERS
All
ARCHIVES
July 2024
|
 RSS Feed