
|
While being located geographically in the middle of the United States, it may not seem like seismic bracing would be a major concern. After all, we don’t have the frequency of intense earthquake movement that covers news headlines like the west coast experiences. Despite the (fortunately) absent frequency, the New Madrid fault line runs near Memphis, Tennessee up to the bootheel of Missouri. [Note: Yes, we Missouri-folk actually describe a portion of the state as a “bootheel”. When you say it aloud, though, you have to add a little twang.] Back to seismic – this fault line has the potential for very strong seismic activity just as much as portions of California and the Pacific Northwest. As a result, seismic bracing is common for us in southeastern Missouri, in St. Louis, and even into central Missouri and southwestern Illinois.  As we move away from the fault line, at some point, seismic movement would be less severe – even to the extent that bracing isn’t necessary. Where is that point? How do we determine when seismic bracing is necessary for fire suppression systems? Today’s article is covering just that. It’s an exercise I practice commonly as I essentially live on the boundary of where seismic is and is not required by code. International Building Code References ASCE 7 Seismic bracing has roots in NFPA 13. As is the case between a “code” and a “standard”, however, NFPA 13 as a standard only tells us how to design and install the system. Code tells us when and where systems and components are required. The International Building Code Section 1613 for Earthquake Loads requires that “every structure… including nonstructural components that are permanently attached to structures and their supports… shall be designed and constructed to resist the effects of earthquake motions in accordance with ASCE 7”. [2015 Edition 1613.1] There are a few exceptions, most notably detached one- and two-family dwellings in some areas. ASCE 7 Requirements Based on Seismic Design Category ASCE 7, Chapter 13 (2010 Edition), for Seismic Design Requirements for Nonstructural Components, states: ASCE 7 Chapter 13 addresses Seismic Design Requirements for Non-Structural Components. Its scope covers the minimum design criteria for nonstructural components (like fire suppression systems) that are attached to the structure. ASCE 7 Chapter 13 suggests that seismic bracing is required for all structures, unless they meet an exemption. Section 13.1.4 specifically lists exemptions from seismic design requirements. These Exemptions include:
Additionally, ASCE 7 Section 11.7 states that Seismic Design Category A need only comply with Section 1.4 (not Chapter 13). So What is a Seismic Design Category? A Seismic Design Category is a “classification assigned to a structure based on its Risk Category and the severity of the design earthquake ground motion at the site.” (ASCE 7 Chapter 11 Definitions) In short, it’s a classification on the entire structure, ranging from A (least risk) to F (greatest severity). Seismic Design Category A structures encompass buildings of ordinary occupancy located on sites with stiff soils and have little risk of experiencing earthquakes. Seismic Design Category F, on the contrary, are required to remain functional following a strong earthquake, such as hospitals and emergency communication centers, and are located very close to major active faults. What Impacts Seismic Design Category? Several contributing factors are combined to give the seismic design category. They principally include:
Structures that are of high importance following an earthquake, such as a hospital, are of greater importance and carry a higher risk category. Soil conditions greatly impact the ability of the building to response to motion. Stiff soil or rock conditions generally allow the building to better respond to an earthquake. Loose soil, or soft clay don’t give buildings the ability to move with the ground, and therefore create worse seismic reaction forces within the building. Lastly, and probably the most obvious, the building’s proximity to a major fault line. The closer to a fault line, the greater the seismic forces from an earthquake event for the same earthquake. 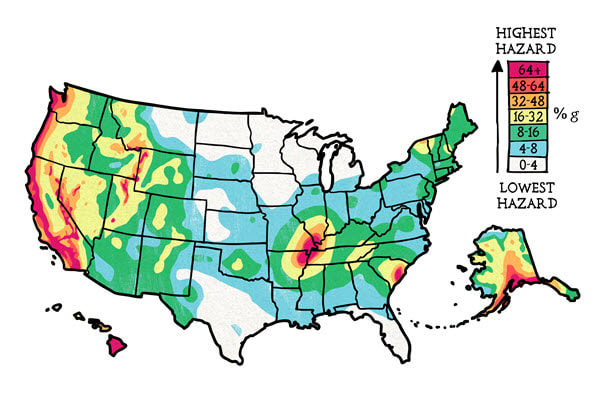 How to Determine Seismic Design Category? The International Building Code Section 1613 allows the Seismic Design Category to be determined either by IBC 1613 or ASCE 7. The International Building Code Section 1613 details the step-by-step process to determine the Seismic Design Category. This involves using data from site soil testing, the Risk Category, and earthquake severity parameters from provided maps. ASCE 7 has similar provisions in Chapter 11, detailing similar inputs of Risk Category, Mapped Response Parameters, and site conditions. In practice, however, there are third-party tools that help make this process much easier. Here are a few available, for free online:
With the Risk Category, Address, and Site Information, a Seismic Design Category can be quickly determined for a building. These reports also give important design parameters that will be used for Seismic Calculations for the design of the system. What if I Don’t Know The Site Class? With new construction, structural foundation design requires geotechnical testing and reports which give these values. The structural engineer will assess the report, and typically place the building’s Seismic Design Category in their front-sheet notes or in structural specifications. This isn’t the case with interior remodels or work within existing buildings. No soil testing is done and sometimes no structural work is done. When this is the case, the International Building Code requires a Site Class D to be used (IBC 1613.3.2). This could be made more conservative by the building official if geotechnical data determines that Site Class E or F soils are present at the site. So Does My Building Require Seismic Design? Back to the original question – once we know the Seismic Design Category, it’s easy to determine where fire suppression systems require seismic design. If the Seismic Design Category is A or B, then Seismic Design Criteria does not apply. If the Seismic Deign Category is C, D, E, or F – then Seismic Design Criteria applies. Under this later scenario, all the requirements of NFPA 13 for Seismic Design now become an enforceable requirement for the system design. Here’s a summary of the code path: 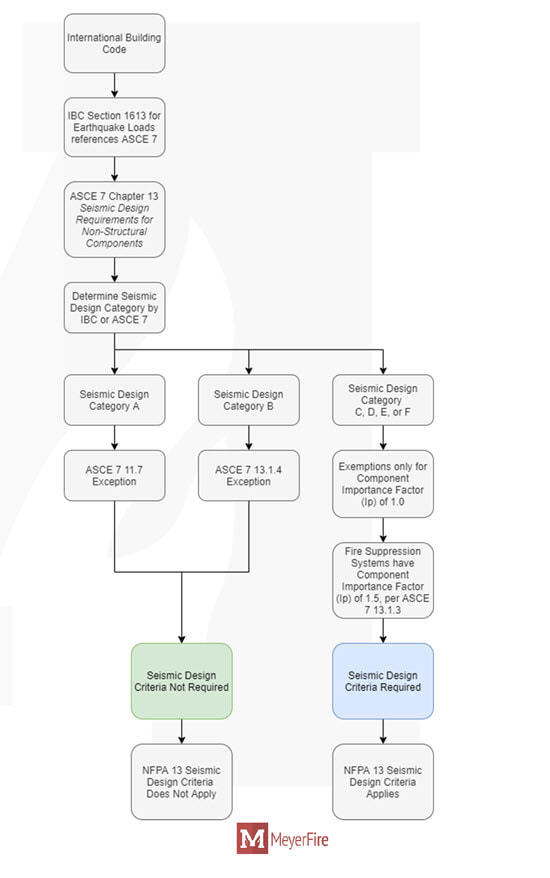 Summary
Seismic Design Criteria for Fire Suppression Systems depends upon the Seismic Design Category for the Building. This Seismic Design Category incorporates the importance of the building, it’s proximity to seismic fault lines, and soil conditions at the site. While the determination path through codes & standards might not be as clear as other system requirements, seismic design is nonetheless a crucial component for the performance of a fire suppression system and an important consideration in the design of the system. Like this article? Consider subscribing here. Already subscribed? Consider sharing with a colleague who might benefit from this. Design-specifications have had a tradition and sometimes contemptuous past in the world of fire protection design. Sometimes called “design-build spec”, “performance-specification”, “delegated design”, “deferred submittal documents”, “scope drawings”, or “design-spec”, these all mean relatively the same thing; the engineer is not providing a working submittal of how a fire suppression system should end up in the field. Back in 2008 advocacy groups from the Society of Fire Protection Engineers (SFPE), National Society of Professional Engineers (NSPE), and National Institute for Certification of Engineering Technologies (NICET) adopted a joint position on the role of the Engineer and the Engineering Technician as they relate to fire protection systems. A summary and full-length document are here. The position statement does a good job of identifying the relationship between engineering documents and a working shop drawing submittal. It maintains that the role of the Engineer is to support the proper protection of the public’s health and safety. A licensed Engineer is required to understand a broad sense of fire protection beyond just suppression, and also has specific state requirements for licensing and authorization. While the position statement does a good job of identifying roles and defining the relationship between an engineer and a technician, real-world experience says that many “design-build specifications” fall short on good practice. I’ll save my frustrations on the lack of quality engineering documents for another day (it is not a regional issue). There is a ton to explore on that topic. I will however offer up what I like to use as a practical checklist for design-build specifications. Not all owners want to pay consultants to flush out all the details of a system. I get it. But if an owner is paying for anything at all, then the documents should address basic requirements and cost-impacting elements of design. 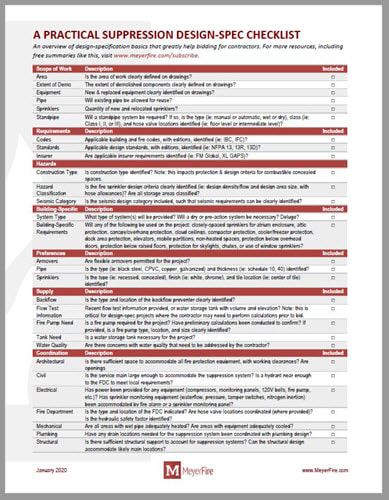 If a set of plans just outlines an area and says “per NFPA 13”, then someone isn’t doing it right.
This cheatsheet is a collection of the items I’m looking for when I help contractors bid jobs. It’s a shortcut to all of the items that have a design and cost-impact to a job. If you, as a consulting engineer, address every single one of these items clearly and within code, then pat yourself on the back my friend, you are a gift. If your documents don’t address each of these items (yes, including flow test information), consider making it a part of your regular practice. None of the items on this list are major time consumers, but by accounting for them you’ll allow better bidding from contractors and much less contention after bids are due. Please, please: don’t loft up vague project requirements to contractors and hope for the best. Invest in being a knowledgeable and quality practitioner of this great industry. It'll more than pay itself back to you. What are your thoughts? What type of bid documents are you used to seeing? Join the conversation and comment here. Now that I live with one hand in creating shop drawings and the other in consulting, I don't come across this question quite as often as I had. In general, people don't call unless they know they need fire protection help. When I worked for MEP firms, I came across this question all the time. As in evaluating this on every single project. "Does the building code require a fire sprinkler system?" The adopted building code is the first stop in determining whether a fire sprinkler system is required or not (not standards, such as NFPA 13). In the International Building Code, this is generally Section 903.2 for fire sprinkler systems. You'd first determine your building occupancy (from Chapter 3), then go to 903.2 to see if your facility's footprint is large enough, has enough occupants, or meets the other nuanced criteria to bring in a fire sprinkler system. I have gotten caught ignoring the special applications - in my case a windowless basement that didn't have enough openings which drove sprinkler requirements. We got sprinklers in, just later in design than I would have liked. This cheatsheet below is a summary of the requirements among various occupancies and other drivers for fire sprinkler systems, according to the latest IBC (2018 Edition). 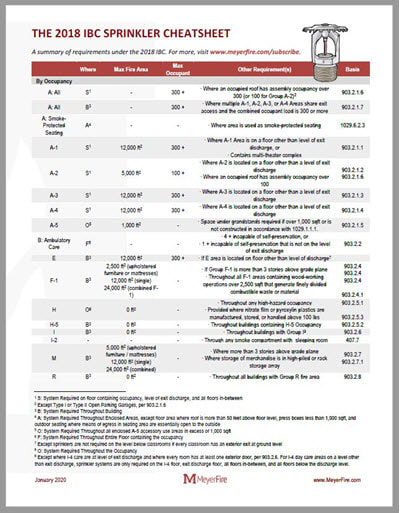 It is worth noting that local code adoptions, insurance requirements, or the International Fire Code can also introduce the need for fire sprinkler systems.
As you may know I'm a fan of cheatsheets, so I hope you find this helpful. If you think it'd be beneficial to also cover other IBC editions, let me know in the comments here and I can get that moving too. Thanks & have a great week! Oprah had an annual favorite-things list. I've always thought that would be fun to do - except I can't offer everyone a Pontiac G6. Sorry about that. My wife says the kids need to eat. I will however continue to make lists of my own. This one isn't necessarily a "favorite-things" but rather interesting topics and tools I plan to keep an eye on for 2020. A Long-Awaited Computer-Based PE Exam The Fire Protection Principles and Practice of Engineering Exam (PE Exam) will finally become computer-based in 2020. This has been discussed for many years and will bring Fire Protection in line with several other disciplines and the Fundamentals of Engineering (FE Exam). Likely a much bigger change to the 2020 Fire Protection PE is replacement of the treasure-trove of references (over 9,000 pages) into a single exam reference guide which is being developed by SFPE. This single resource will be all that is allowed in the exam room. While the exam focus and content should be relatively consistent from past years, preparation for 2020 will be a different challenge than in years’ past. Around here, I’ve already been contacted by numerous people seeking the publish date on both the 2020 MeyerFire PE Prep Guide and the PE Exam’s Reference Book. The 2020 MeyerFire PE Prep Guide will follow the official reference book by a month (which is rumored to debut sometime in Spring 2020). I’m keeping my fingers crossed that the official reference book will be early enough to give everyone ample time (including instructors) to study and absorb it. At least for 2020, the Fire Protection PE will only be given on a single-day (October 22, 2020). Going computer-based might someday afford year-round testing availability like the Mechanical PE Exam is starting this year. That will certainly be another interesting change when it happens.  The Fire Protection PE Exam's joining the twenty-first century with its first computer-based exam in 2020. Viking’s New Window Sprinkler Viking just released a new listed Specific-Application Window Sprinkler. Use of window sprinklers have long been a strenuous and often misapplied technology, but the new Viking lineup could offer additional options in this space. I'm very interested to see how the new sprinkler gets used in the market.  The brand-new window sprinkler is only the second entrant to a complex & niche application. If you haven't checked lately, it's already in our live Sprinkler Database. Nitrogen’s Rise Have you seen it? I have. Nitrogen inertion is becoming more and more commonplace each year. This year is the first I’ve seen a project specify a nitrogen-inertion system upfront with a dry-pipe sprinkler system. Finally! As an industry I feel like we're all slowly learning and educating owners on the major cost-savings these can have, but until recently I've yet to see them specified on a project. It's good to see other consultants getting traction with owners on the topic.  Projects under the United Facilities Criteria (UFC 3-600-01) allow a hydraulic c-factor of 120 in dry systems with nitrogen included, which are now mandatory for dry systems. This is a great benefit I hope the NFPA 13 continues to consider adopting. It can be difficult enough to convey to owners the cost/benefits of avoiding corrosion in sprinkler systems with a higher upfront cost, but if we get a hydraulic kick-back for inclusion of nitrogen systems then the conversation could be made substantially easier with owners. Depending on the system size, a hydraulic benefit might help contractors to voluntarily provide nitrogen systems and save on pipe sizing throughout. New & Better Tools for Revit I live entirely in BIM (Building Information Modeling), so I’m always on the lookout for great Revit families, tools and workflows. The past couple years have really ramped up the race for fire protection tools in BIM, including Victaulic’s Revit Add-In, AutoSPRINK’s RVT lineup, HydraCAD for Revit, and a few others. I’m very encouraged that there is finally interest in this space and that the developers in it seem to be doing very well.  Revit Add-In productivity-boosts have made even small projects like this home design I completed in 2019 possible at a very reasonable time and cost. I just started using the RVT platform in 2019 and have found major productivity boosts by doing so. If you use Revit and haven’t checked out these platforms, 2020 might be the year to check them out.
Why This Site Exists I don't (usually) just write to entertain myself. I put together this site to help start the conversation on fire protection. If you're relatively new around here - I'd like to introduce myself. I'm Joe. I'm no an end-all expert in the field, just a normal guy who loves being in fire protection. I worked for and learned under a couple engineering consultants before starting my own practice in 2019 where I now write, build tools and design full time. This site is all about bringing together experts from the different corners of fire protection to discuss and share best practices. We're all about improving your workflow and your knowledge with resources and ideas - plus giving a medium for you to share your expertise to everyone's benefit. Thank you for hangin' around and I look forward to sharing in a great 2020 with you! This time of year is just the best. I feel extremely fortunate to have three young kiddos at home, a supportive and all-around great family, and an extremely rewarding career in fire protection and doing what I do here at MeyerFire.com. Whether you subscribe, dabble occasionally on the forum, or just stop in to use tools here and there, THANK YOU for a really wonderful 2019. One of the tasks of wrapping up a year is revisiting what resonated the most in 2019 of all the content here. If you just joined in this year or know someone who would benefit from this content, please consider sending a link.
While we're at it, here are the Top Ten Tools & Articles of 2018 and the Top Ten Tools & Articles of 2017. Hope you have a relaxing and rewarding holiday week wherever you call home!
I've been on a bit of a tool creation kick lately. Sorry, I just get excited sometimes.
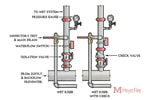
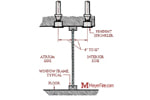
This week I'm introducing a small portion of a much larger programming effort - this tool helps determine an adjusted fire sprinkler remote area based on the system type and density/area curves of NFPA 13. It can factor in the quick-response area reduction, sloped ceiling adjustment, double-interlock pre-action or dry increase, and high-temperature sprinkler decrease. I'll probably only have this up as a free version for a month or so before adding to it and incorporating the full tool in the Toolkit. At the bottom of the tool you'll see a schematic remote area drawn with the parameters input. I'm using it when mocking up hydraulic calculations for estimation or when I'm first setting up a hydraulic calculation. Give it a shot and let me know what you think! This week I'm pulling back the curtain a little bit and showing a tool that is very much still under development. It's a water-storage tank sizer that incorporates a handful of decisions that go into water storage tank sizing. I'd like to get it in front of you this week as I'm looking for feedback on how to improve this tool. There's not a lot of great documentation on how to size water storage tanks, but there are plenty of variables that impact proper water storage tank sizing. With that said, check out the tool as part of our Toolkit package here: If you're in the water storage tank space and have tips or feedback, please email me at joe@meyerfire.com or comment here. I'd be very much interested in ways to improve this one (or any tool for that matter). On a side note, this and many other recent tools are going to be included with a major MeyerFire Toolkit update here in the next few weeks. We've been working quite a bit on improving the activation/subscription process which has been no small task. When that gets cleaned up I'll be happy to send out the major update for the Toolkit. Hope you have a great rest of your week! Occasionally I come across projects where the contractor (my client) is looking to use listed anchors or attachments that are listed, but have various strengths associated with them. NFPA 13 lists the maximum spacing for hangers, but this maximum spacing doesn't always address these alternative hanging methods. NFPA 13 addresses these by requiring that any hanger assembly be able to support five times the weight of water filled pipe, plus 250 pounds. Based on this, I've created a calculator that reverses this process and calculates the maximum spacing for hangers depending upon the pipe size, type, and strength of a hanging element. As this is the first week out I only have I-P units (sorry international friends, I'll continue to work on this), but let me know what you think in the comments section below. 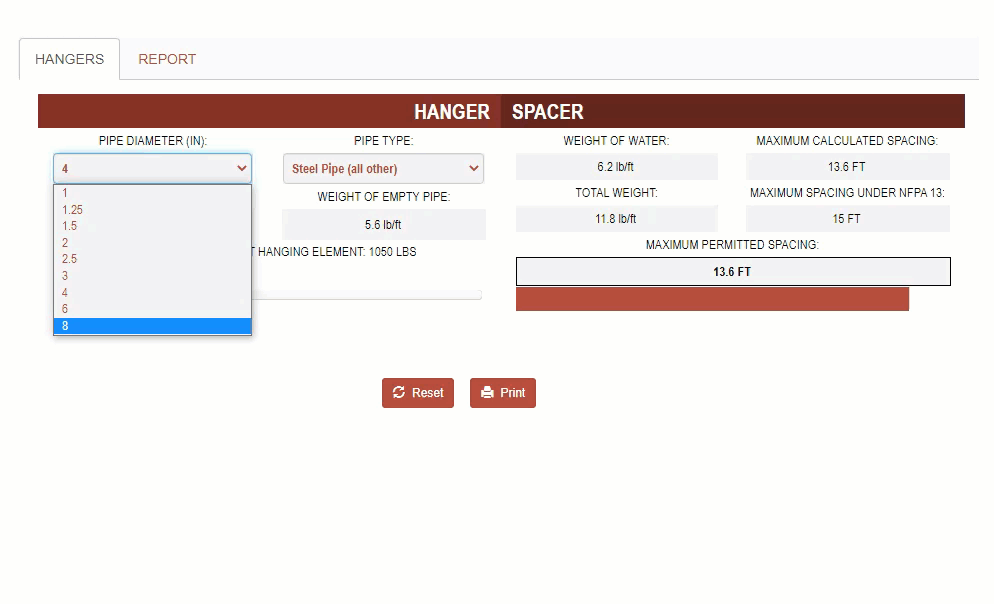 Thanks and for those in the US have a great Thanksgiving week! “What’s the advantage of a wet-pipe fire sprinkler system over a dry-pipe fire sprinkler system?” If you’ve been in the industry a long time you might scoff at the question, but I’ve been asked a couple times from different non-fire protection clients. Grab a pen real quick. Identify all the reasons why we don’t do dry systems everywhere. Seriously – see how many you come up with. If you only said cost – you hit the big one. Dry systems are more expensive than wet. But there’s more to it than that. A lot more. Here’s my reasoning why dry-pipe systems are more challenging than wet systems. Compare it to your list and post your thoughts below in the comment section here. 1. Cost The biggest driver (as is with much in construction) for wet over dry is the cost. Cost is impacted by - the inclusion of a dry valve, - air compressor (or nitrogen generator) - potentially different pipe types - additional labor to design and install sloped pipe - inclusion of a remote inspector’s test - potentially additional low-point auxiliary drains with drum drips, and - use of dry-pendent style sprinklers in unheated areas 2. System Configuration With wet systems, we’re able to design tree, looped, or gridded sprinkler systems. Dry systems are limited to tree or looped systems (NFPA 13 2002 7.2.3.5, 2007-16 7.2.3.10, 2019 8.2.3.10). Gridded systems specifically can be great for bringing down branch pipe sizes by distributing the flow across mains and gridded branches. With more pathways to flow, there’s less overall friction loss from supply to sprinkler. Looped systems can benefit from a similar premise, but looped systems don’t benefit from flow down gridded branch lines. Looped systems with long branchlines can still have larger branch pipe diameters. 3. Slope Dry systems must slope to a drainable location (NFPA 13 2002 8.15.2.3.1, 2007-16 8.16.2.3.1, 2019 16.10.3.1). All dry system pipe must be sloped. For large or complex areas, these slopes can add up over time and result in big differences in pipe elevation. I worked on a pre-engineered metal building once which was several hundred feet long. We originally planned for a dry system due to a large exposed material storage overhang at the end of the building. 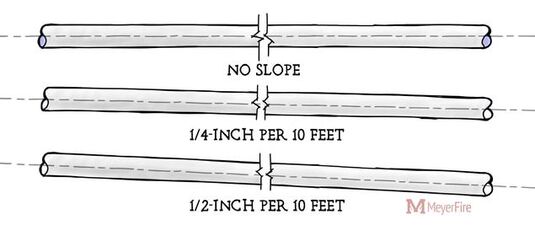 The three pipe slopes that appear in NFPA 13. Non-refrigerated mains require 1/4-inch per 10 feet slope, while branches and any refrigerated locations require 1/2-inch per 10 feet slope (NFPA 13 2002 8.15.2.3.1, 2007-16 8.16.2.3.1, 2019 16.10.3.1) The slope on the main from one end of the building to the other resulted in a difference of about 8-inches in height. Even splitting the difference and sloping to a high-point in the middle of the building was too much height difference for the building. We were trying to stay tight to structure and above wide overhead doors. The pre-engineered building had such little elevation tolerance (it was intended to house commercial trucks) that the slope on the dry mains were causing issues. Long story short – the slope of the pipe caused enough issues that the design of the building was shortened by six feet to accommodate dry sidewall sprinkler throws and not need a dry-pipe system. Keeping the entire system wet allowed level main runs and reduced overall cost to the project. It may be the only project I ever work on where the building size was adjusted to accommodate sprinklers, but it resulted in a much more cost-effective solution. See more about pipe slope in a prior article here. 4. Corrosion Dry systems suffer accelerated corrosion compared to wet-pipe systems. Those who inspect or replace dry systems know that their expected lifetime can be as short as a few years to as long as about a decade. Why do dry systems corrode faster than wet? They have more oxygen molecules introduced to the interior pipe network than wet systems do. A combination of water vapor (from originally filling the system, trapping water, or introducing moisture through air compressors) and oxygen will corrode the system. Wet systems suffer the same, but in much smaller quantities. In wet systems oxygen is only introduced from trapped water when the system is drained and refilled, or within the fresh water to the system. 5. Pipe Types Some specifiers differ in pipe specifications between wet and dry systems. Many do not, but some do. While galvanized pipe is no longer a standard for dry systems in the industry (and for good reason), dry systems may necessitate schedule 40 pipe to slow the progression of corrosion in the system. Pipe wall thickness not only affects cost and time to install, but it affects hydraulics too. 6. Hydraulics Speaking of hydraulics, dry systems require a 30% increase in the remote area (NFPA 13 2002-16 11.2.3.2.5, 2019 19.3.3.2.5). The system essentially must accommodate a larger fire because a fire has the ability to be larger in size before the sprinkler system can introduce water. This 30% increase in the remote area results in significantly more water and often larger main size than a similarly designed wet system. Additionally, NFPA 13 requires that dry-pipe systems use a Hazen Williams C-Factor of 100 in lieu of 120. While this may change in future editions of NFPA 13 when paired with nitrogen inertion (as UFC criteria has), it’s still currently only 100 (NFPA 13 2013 Table 23.4.4.7.1, 2016 23.4.4.8.1, 2019 27.2.4.8.1) for black steel. This higher friction loss can also result in larger pipe sizes. 7. Dry Pendents Not all sprinkler types are allowed to be used in dry systems. If a pendent sprinkler is located in an area where the return bend is not kept above 40-degrees, then it must be a dry pendent (NFPA 13 2002-16 7.2.2, 2019 8.2.2). Dry pendent sprinklers are significantly more expensive than a traditional pendent sprinkler, and introduce other manufacturer requirements (minimum shaft length, insertion into tees and not elbows). 8. Remote Inspector’s Tests & Drum Drips Wet systems can locate inspector’s tests (included to show water flow and test the waterflow switch) just past the flow switch as a riser. Dry systems, however, require that an inspector’s test be located at the most remote point of the system (NFPA 13 2002 8.16.4.3, 2007-13 8.17.4.3, 2016 8.17.4.2, 2019 16.14.2). This accessible valve at the most remote portion requires more pipe & coordination than a test at the riser often does. 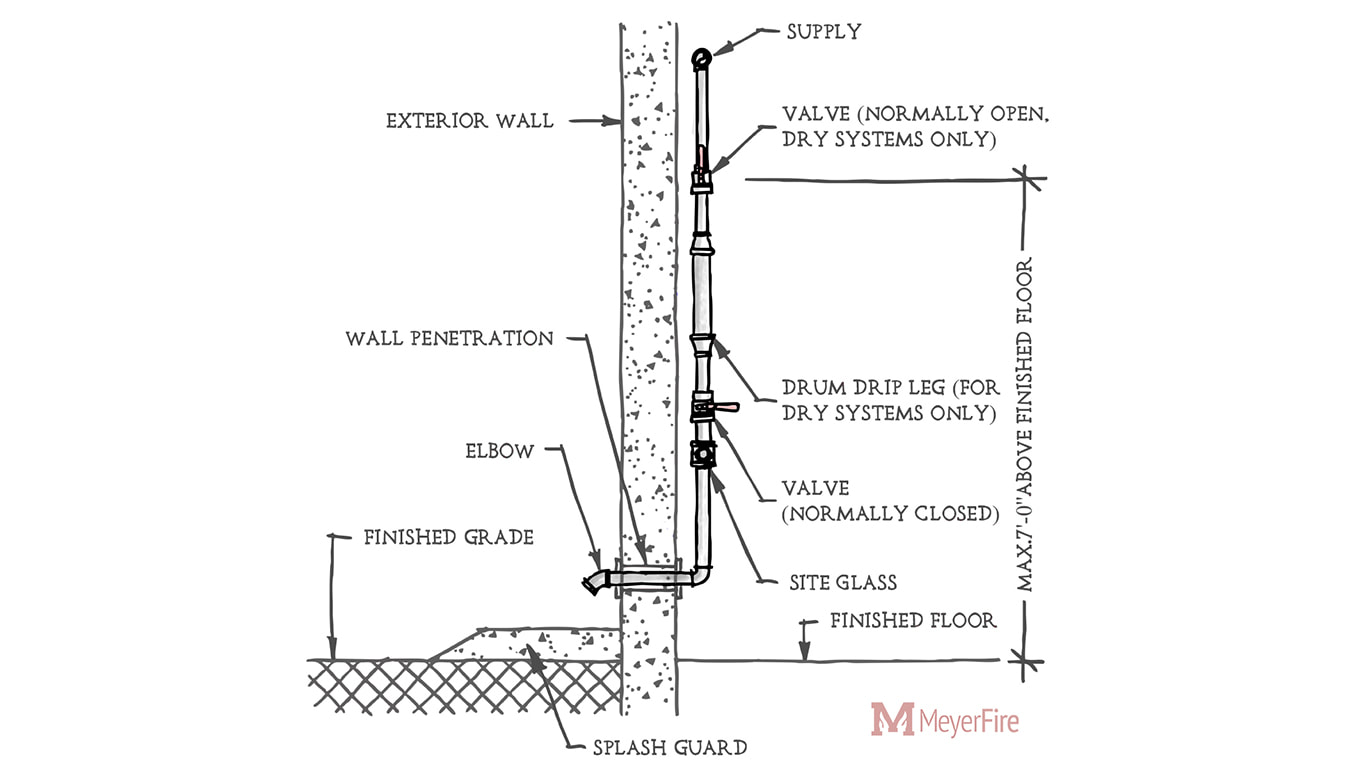 Remote Inspector's Test (and drain shown here) come with an assortment of requirements. See a full detailing and breakout of the Inspector's Test here. Summary
We use dry systems when we need to accommodate temperatures less than 40-degrees (F). Much of the time there isn’t a choice between a wet and dry system. Some applications, though, could go either way. Early in design is often a great time to discuss heating options for spaces throughout a building. While the difference between 30 and 50 degree setpoints may not have major ramifications mechanically, it can have a major impact on the design of the suppression system. Your Thoughts What impacts have affected your projects the most? Comment below here. If you've found this helpful, consider subscribing here and sharing with a colleague. Thanks & have a great week! In my regular code calls I used to include a specific question on the use of clean agent systems in server rooms.
Building Owners & Sprinklers Many building owners provide clean agent systems to extinguish fires in high-value content areas, such as server rooms, data centers, archival storage, and many other applications. When the owners voluntarily pony-up for extra protection in these areas, they often ask whether sprinklers have to be installed in those spaces at all. My Code Call Question On my code calls, my question would go something like: “does your jurisdiction require sprinklers to be installed in rooms which are protected by a clean agent system?” I would get a mixed response. Some jurisdictions considered clean agent systems to be an equivalent for sprinkler protection, others would not. A couple years after asking this question on every applicable project I had a fire marshal shoot me straight. “If you don’t have sprinklers in the room, you don’t have a fully-sprinklered building. Check the IBC.” This was news to me. I was under the impression that use of clean agent systems could be used as a substitute for fire sprinklers and still be effectively “fully-sprinklered”. Back to the Book There is a path for this approach – the International Building Code (2018) Section 904.2 states that: “Automatic fire-extinguishing systems (ie: clean agent) installed as an alternative to the required automatic sprinkler systems of Section 903 shall be approved by the fire code official.” This was the foundation on which I had been asking the question. The big kicker was the code section just a paragraph later: “904.2.1 Restriction on using automatic sprinkler system exceptions or reductions. Automatic fire-extinguishing systems shall not be considered alternatives for the purposes of exceptions or reductions allowed for automatic sprinkler systems or by other requirements of this code.” Outside of the lawyer-phrasing, this section simply states “no sprinklers in the room – no sprinkler reductions or exceptions for your building.” The commentary by the International Code Council goes further, stating that while the authority has the ability to approve alternative systems in lieu of sprinklers, doing so invalidates the “fully-sprinklered” status of a building. Why Does this Matter? Why is this important? There is a long list of code kickbacks that sprinklers offer a building. A couple months ago I diagramed a cheatsheet for all of the major code benefits a “fully-sprinklered” NFPA 13 fire sprinkler system offers. You can download it free here. Code benefits include allowable building heights, building areas, number of stories, egress benefits, passive rating reductions, Draftstopping reductions, fire alarm reductions, and a handful of other benefits. I realized after that code call that the question affected well more than just my isolated “fire sprinkler” silo. Omitting sprinklers in just one server room would have code implications throughout the complex. Now, should building owners ask about omitting in these rooms we often look at other strategies – such as concealed sidewall sprinklers, use of dry sprinklers, drip pans, use of pre-action systems, or piping without joints and heavy-duty cages. Some of these solutions can be painless, without great cost and satisfy code as well. Want more like this? Subscribe to the blog here. Already subscribed? Send to a friend. Thanks for reading! |

ALL-ACCESS
SUBSCRIBEGet Free Articles via Email:
+ Get calculators, tools, resources and articles
+ Get our PDF Flowchart for Canopy & Overhang Requirements instantly 
+ No spam
+ Unsubscribe anytime AUTHORJoe Meyer, PE, is a Fire Protection Engineer out of St. Louis, Missouri who writes & develops resources for Fire Protection Professionals. See bio here: About FILTERS
All
ARCHIVES
May 2024
|


 RSS Feed